PDF Version:
The following exercises are also available as a notebook within the construct simulation. The ROSject was created by Gerard Canal and Stefan Bezrucav.
Preliminaries
We will use The Construct as the simulation environment. This eases the task of setting up ROS, ROSPlan and eases the way to running the simulations.
To start with, you will need to create an account here. Once you have your account, log in the ROS Development Studio, and you will have your workspace.
The next step is to fork the base simulator. Note that each fork is an own copy, so it’s like you were working on your computer. While simulations are public, the files will only be modifiable by you, so be sure to use an appropriate way of sharing code with your group (more on that later).
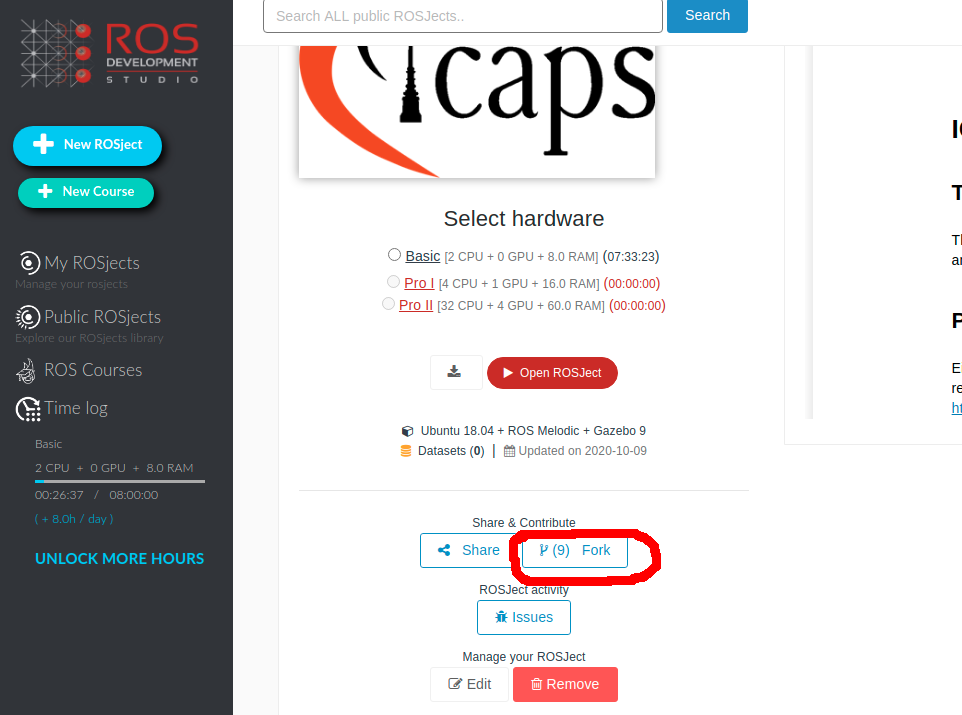
Now, navigate to the Base Summer School simulation: ROSject: Task Planning for Robotics (ICAPS Summer School 2020) and fork it by pressing the fork button and then pressing “yes” so it clones the project:
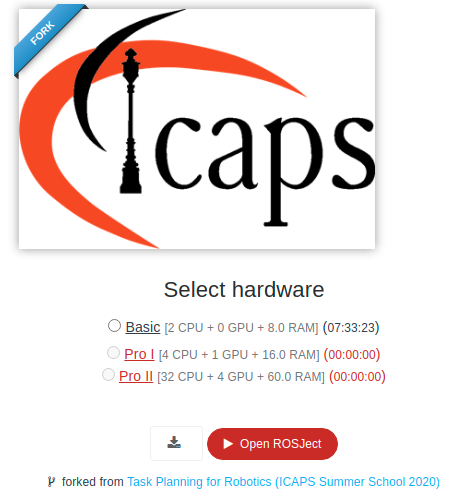
This will bring you to a similar page, but for your forked simulation. Now, start the simulation by pressing “Open Rosject”. Make sure you do that in your fork:
After loading (this may take a while), you should see this screen:
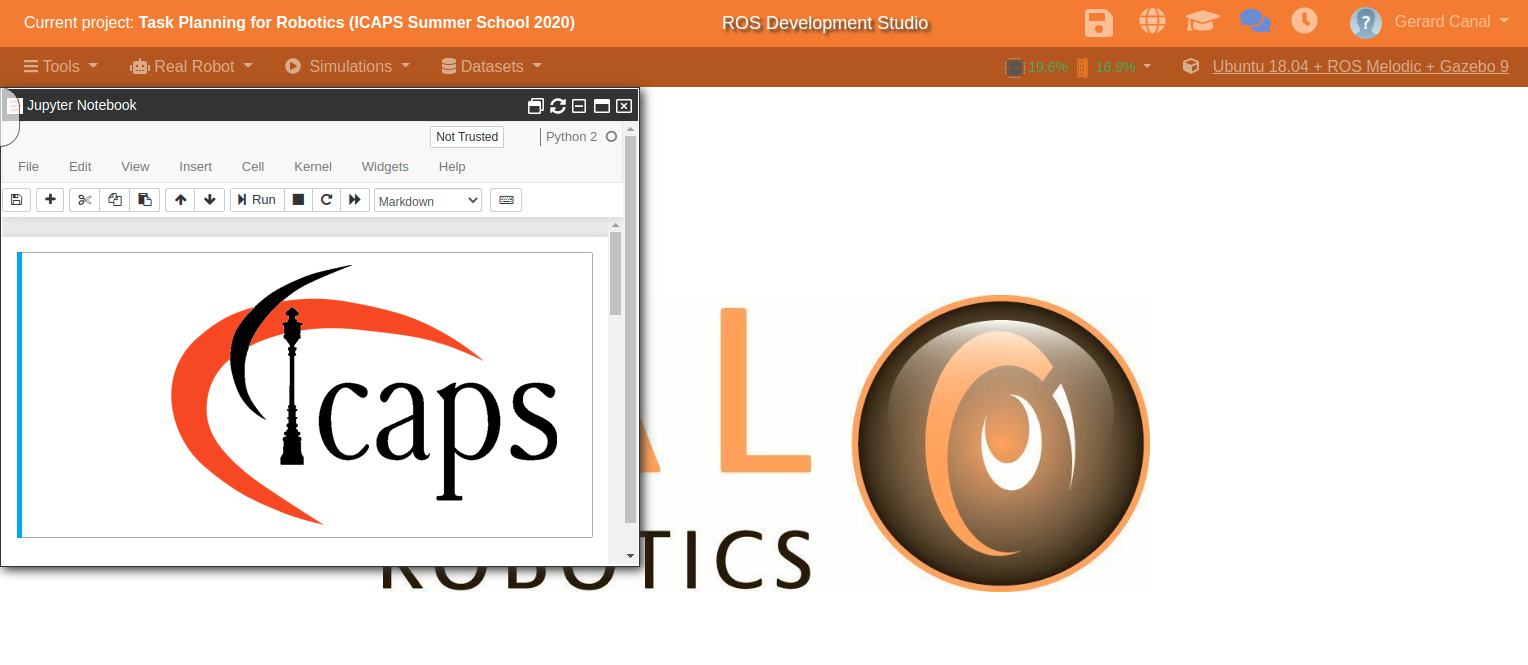
Now, we’re ready to go!
Exercise 1 – Preparation of the workspace
We have prepared a base source code for you to develop. The simulation includes all the needed code already, but the exercises will need you to fork our repository and install it in the construct.
Either individually or with your working group, fork the Training Lab repository with the exercises by going to https://github.com/gerardcanal/ICAPS_20_SummerSchool_ROSPlan

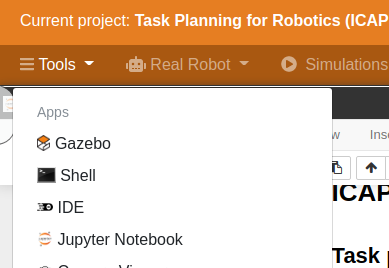
Clone the repository by opening a terminal (shell) in the construct (under the tools setting Tools):
IMPORTANT NOTE You need to run the following code every time you open a new terminal for everything to run smoothly:
source /home/user/catkin_ws/devel/setup.bash
Then clone your fork of repository by running (please, pay attention to this as the destination folder of the files is important):
cd /home/user/catkin_ws/src/
git clone https://github.com/<YOUR-USERNAME>/ICAPS_20_SummerSchool_ROSPlan.git
Note that each of you will work on an independent instance on The Construct, therefore you should share your code through the git repository. Essentially, each instance of the construct is like your own computer. Remember to commit your changes often or save the session in the construct (by clicking on the save button at the top of the window). Otherwise, your progress may be lost!
You can save your progress in the construct by clicking the save icon:
Building the base code
You can build the workspace by running:
cd ~/user/catkin_ws
catkin build
Notice that building takes time in The Construct, therefore you should try to make sure your code works.
Remember to build your code after making changes to source files (basically to cpp files. Changes to PDDL files do not need to be compiled).
Scenario description
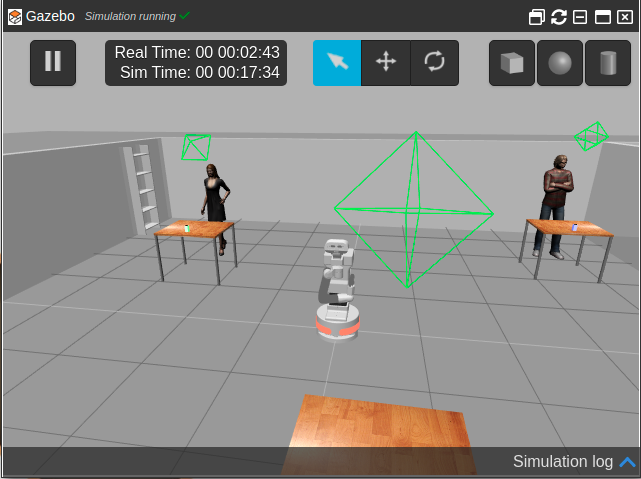
We will use a robotics scenario to illustrate the use of Planning in real-world domains. The scenario looks as follows:
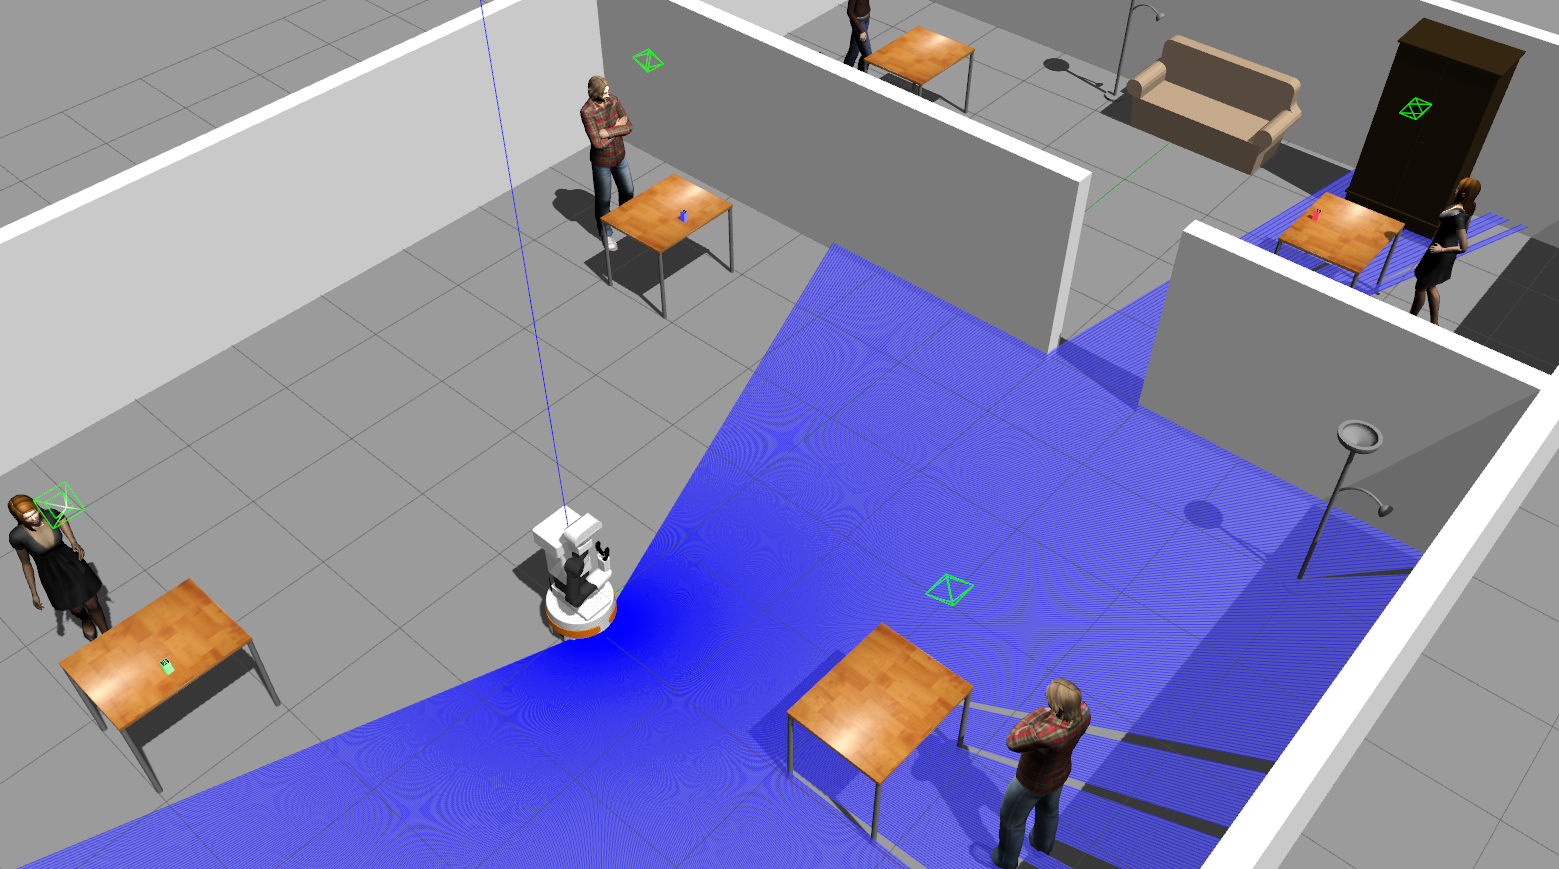
As you can see, there is a robot (Tiago) in a building with different tables, and three blocks (green, blue, and red). The robot has to perform an inspection task, visiting a set of locations in the office (different desks), and move the blocks from their current places to some defined goal locations.
Ideally, the robot should do this in an efficient manner, therefore taking as few time as possible. This will be achieved by trying to minimize the number of navigation actions, and not visiting each place more than once if possible.
Exercise 3 – Running the simulation
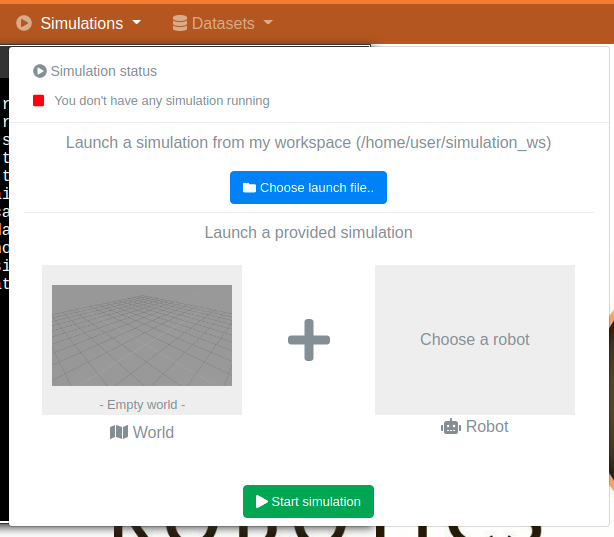
Let’s now run the simulation to open the virtual world. In the construct, press in Simulations:
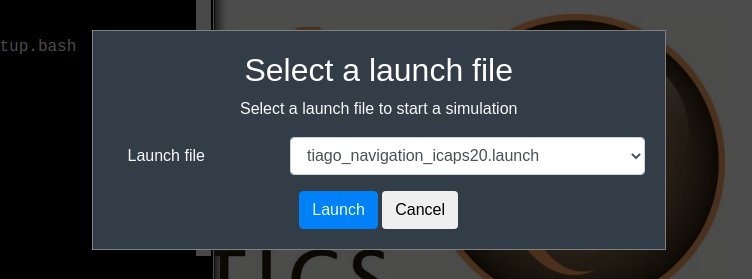
And then, press in “choose a launch file”. You will get a drop-down menu, where you will need to find the “tiago_navigation_icaps20.launch”. Hint: it’s at the end, so scroll to the bottom and you will find it under the section tiago_navigation_icaps20. Make sure you select the navigation one and not any of the other two. Now, press LAUNCH:
The simulator (Gazebo) will start to load:
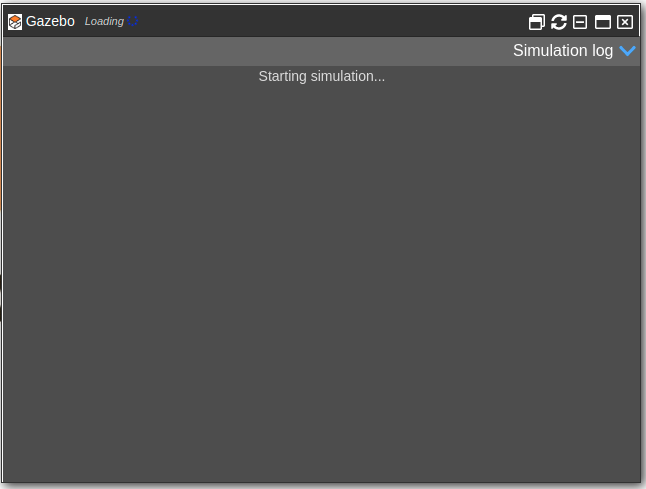
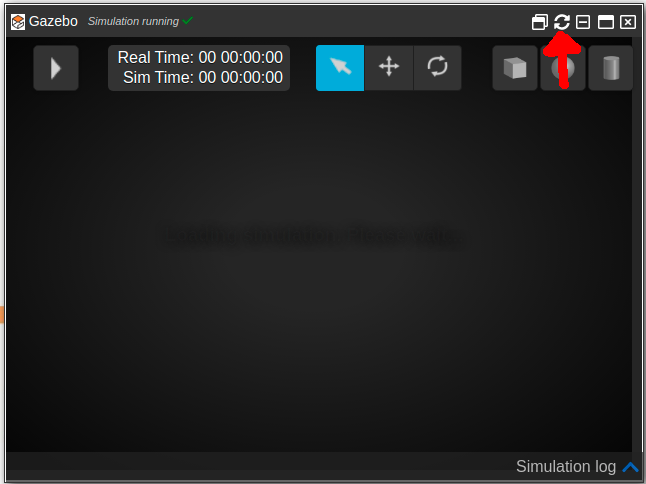
Notice the Loading on the top left, and wait until a green tick appears. If the green tick appears and the simulation is still not there, press the refresh button. An example can be seen here:
It often happens that after pressing refresh it still does not load. If this is the case, go back to the beginning of the exercise 3, press in “Change the simulation”:
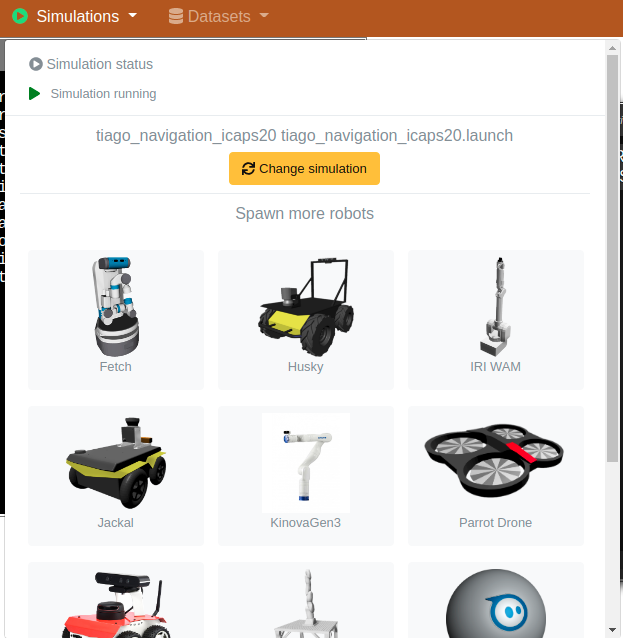
And relaunch it again as we did before. Hopefully, we will have a robot environment this time:
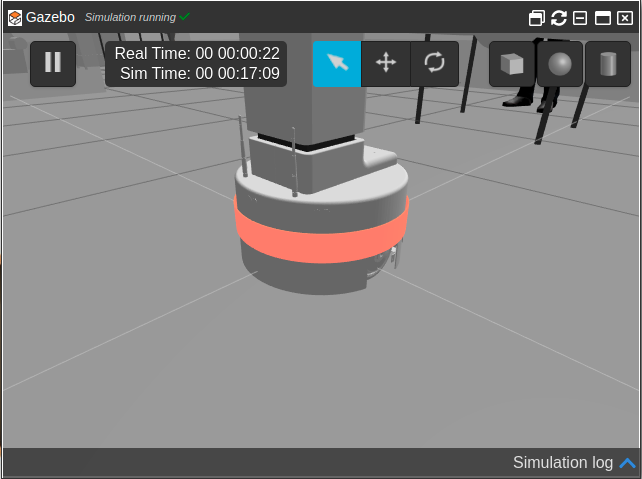
You can move the camera in the simulator with your mouse. With right click (holding it) you can translate the camera, with a middle click (holding) you can rotate it. Before executing anything and after launching the simulation, wait for tiago to tuck his arm and be in this position:
If for some reason Tiago has two arms, refresh the simulation using the refresh button from before.
Exercise 4 – Running more than the simulation
Now that we have the simulator running, let’s see what do we need to run in order to test the planning system.
Open a new Shell terminal, and source the environment:
source /home/user/catkin_ws/devel/setup.bash
Then, run the following line:
roslaunch icaps_ss icaps_ss_full_system.launch
This will launch all the needed ROS nodes for our system to work. More specifically, this starts all ROSPlan nodes needed for planning, and the interfaces for moving the robot.
A ROS node is an executable inside the ROS ecosystem, which is connected to other nodes by means of topics (which are pipes between nodes), services (blocking function calls from one node to another) and actions (non-blocking function calls).
Notice that you can run the system with a custom domain and problem file by doing:
roslaunch icaps_ss icaps_ss_full_system.launch domain_path:=<domain_path> problem_path:=<problem_path>
As an example:
cd /home/user/catkin_ws/src/ICAPS_20_SummerSchool_ROSPlan/ai_planning/common
roslaunch icaps_ss icaps_ss_full_system.launch domain_path:=$PWD/domain_start.pddl problem_path:=$PWD/problem_start.pddl
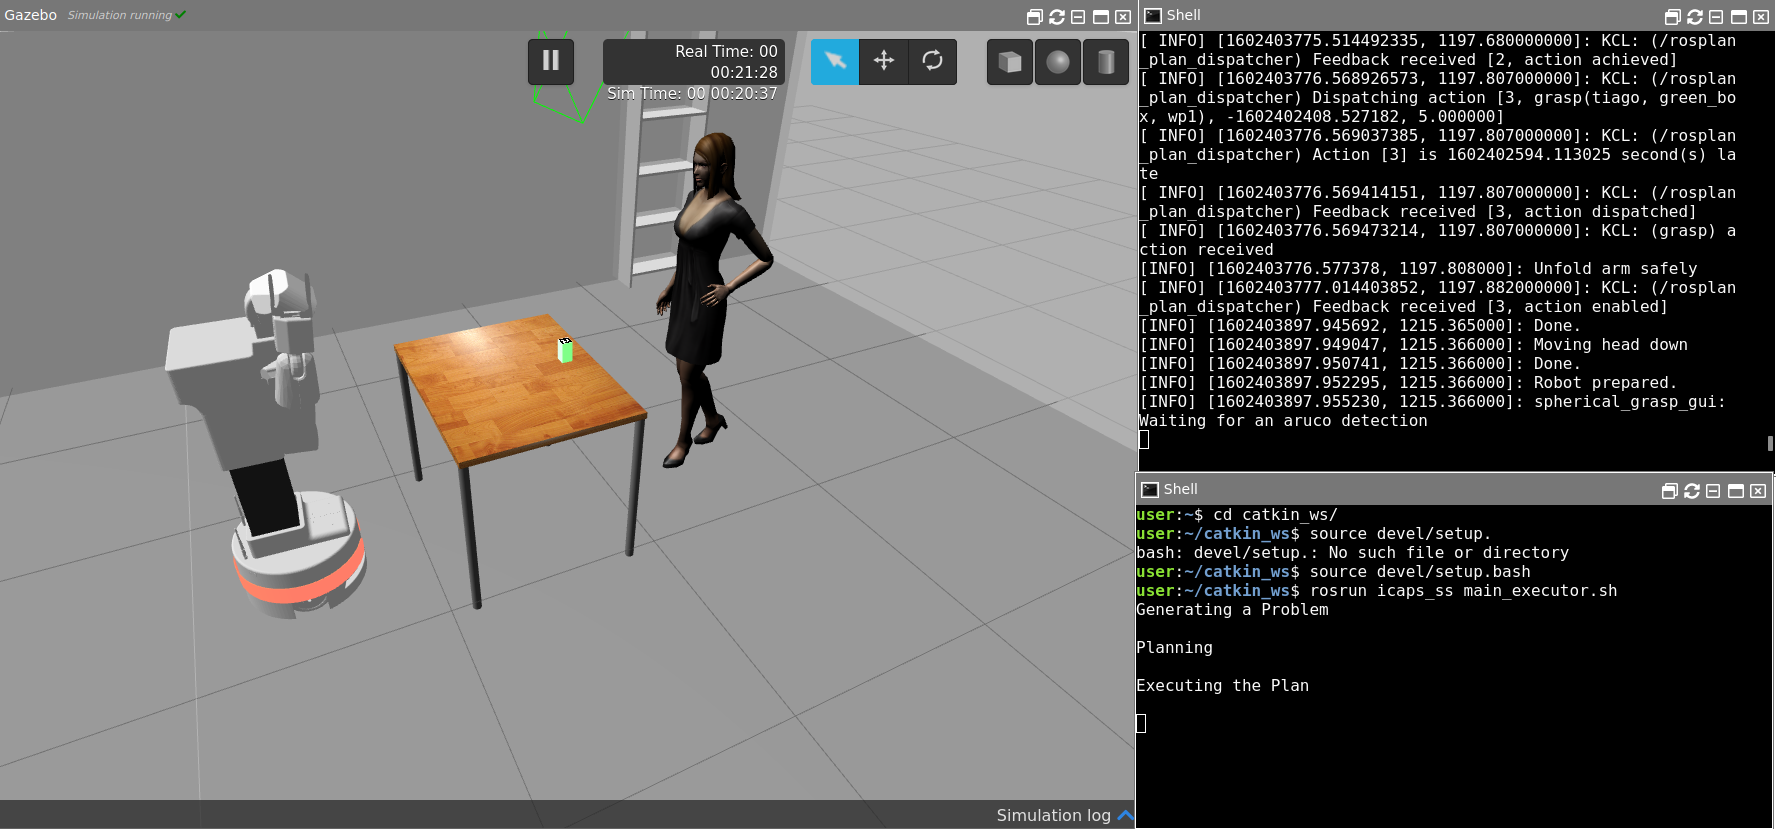
Wait until everything has correctly launched, and you see something like the following in the terminal:
[ INFO] [1602255285.929269681, 1100.282000000]: KCL: (place) Ready to receive
[ INFO] [1602255286.032010338, 1100.294000000]: KCL: (grasp) Ready to receive
Now, you will learn how to run the planning system for the rest of the exercises, and see the robot moving.
Open a new shell terminal, and remember to source the setup.bash:
source /home/user/catkin_ws/devel/setup.bash
Now, to run the planning system and have the robot moving, run:
rosrun icaps_ss main_executor.sh
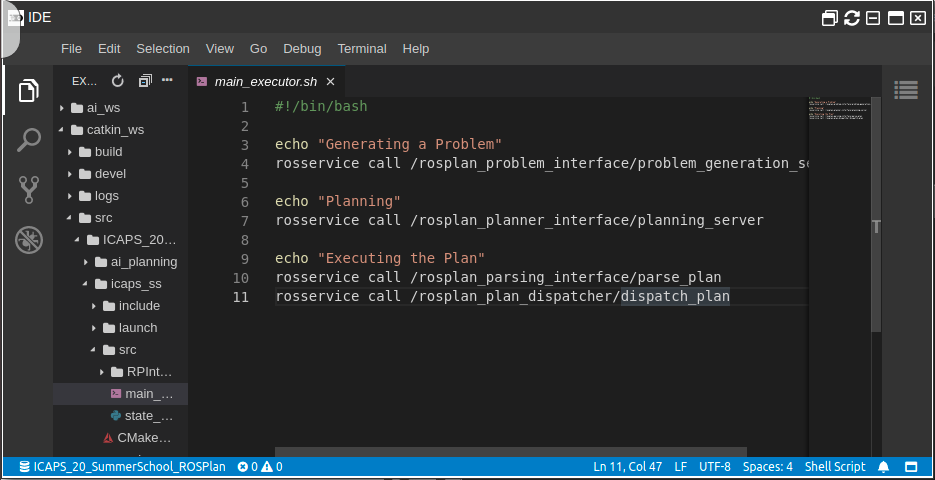
This will run the bash script called main_executor.sh which is inside the ROS package called icaps_ss.
The script performs call to the necessary ROSPlan services to perform:
- Problem generation
- Planning
- Plan parsing
- Plan dispatcher (execution)
You can take a look at it by opening the IDE under the Tools menu in the construct, and navigating to catkin_ws/src/ICAPS_2020_SummerSchool_ROSPlan/icaps_ss Shell/src:
Notice that every time that the planning execution fails (which happens often in the real world), you will need to re-run the script to plan from the current state onwards. Don’t worry about errors that terminal when planning fails.
You can use the IDE to modify the code and files inside the construct.
Once you have seen the robot moving around, try to see what is it doing, but you don’t need to wait until the end. We’ll go through that in the following exercises. You can stop the processes by pressing Ctrl+C in each terminal.
Planning exercises
Exercise 1 – Do we really need planning for this?
One way to solve the problem would be using a State Machine (SM). Therefore, let’s develop one to solve the problem.
First, design a State Machine to solve the “visit all” problem (visiting a set of waypoints in the map). Feel free to implement it in Python, so we can add calls to the robot movements later (this is optional).
Once you have designed your visit-all SM, add there the ability of moving the cubes to the designated locations.
That should have been doable. Now, let’s say we want it to be more efficient, so it minimizes the traveled distance or the time that the robot needs to perform the task. How would you do that?
Exercise 2 – Now let’s try with Planning
The Robot Operating System (ROS) is a set of tools to programming robots. In order to perform task planning for robots, the ROSPlan system simplified a lot the task, as it’s built on ROS and has many planners available, as well as action dispatchers. Feel free to check the webpage and the tutorials, although you do not need to do them in order to complete these exercises.
We have made a visit-all domain that you can find in the ai_planning package, which is inside the repository you downloaded.
The domains are in /home/user/catkin_ws/src/ICAPS_20_SummerSchool_ROSPlan/ai_planning/common. You should use the domain_start.pddl and the problem_start.pddl. Proposed solutions are already there, but we strongly encourage you to not cheat and try to solve the problems first.
Run the domain and see what the robot does. The robot should visit 6 waypoints (places where the robot needs to go, plus the initial position of the robot). Following, a depiction of where is each waypoint located:
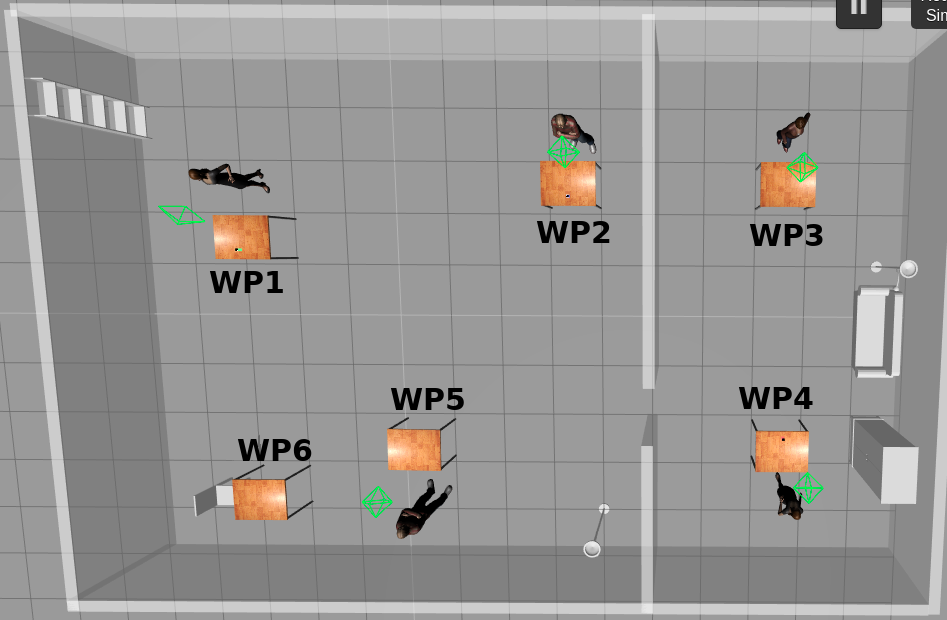
Is the robot visiting all the 6 waypoints? If not, can you fix the problem file so it visits all of them?
Planning for moving objects
Similar to what we did with the SM, let’s add the option to move the objects. If you check the domain file domain_start.pddl, you will see that there are two actions, the grasp and the place to grasp and place an object on the surface, respectively.
- Now, modify the
problem fileso that the planner also grasps and places the objects. More specifically, we want to end the task with:- The red box in the wp2
- The blue box in the wp1
- The green box in the wp3You may also have to specify the initial state, so check where are the objects located!
- Let’s execute now the problem and see what happens. Is the planner able to find a plan? If not, can you find why and fix the issue? Hint: check the domain file, and make sure the actions are correctly defined and make sense
Notice that the robot may fail to perform the grasps, or lose the box in the meantime. In such cases, the plan will continue as if the robot grasping was correct and place an invisible box.
Exercise 3 – Adding costs
At this point, you should be able to find and execute a plan where the robot (tries to) move the cubes around and visit all the set of waypoints. Now, let’s make it more efficient by adding some distance costs.
First, let’s compute the distance between all the set of waypoints. As a help, you can use the following Python2 script:
import rospy
import math

wps = rospy.get_param("/waypoints")

N = len(wps)

def euclidean(a, b):
	return math.sqrt((a['x']-b['x'])**2 + (a['y']-b['y'])**2 + (a['z']-b['z'])**2)

wps['init'] = {'position': {'x': 0, 'y': 0, 'z': 0}}
wp_names = ['init'] + ['wp' + str(i) for i in range(1, N+1)]
for a in wp_names:
	for b in wp_names:
		d = euclidean(wps[a]['position'], wps[b]['position'])
		print "    (= (distance " + a + " " + b + ") " + str(d) + ")"
The script obtains the coordinates of the waypoints which are stored in the ROS Parameter Server (and loaded by the launch scripts). It then prints the distances as PDDL predicates that you can add to your domain.
You can run it by opening a python interpreter in a shell terminal. Remember to source the devel.bash! Then, you can type the python command in the terminal to run the interpreter, and paste the above script.
Modify anything you need so that the planner uses this distance functions to minimize the traveled distance.
Exercise 4 – The real world is more complicated
After completing exercise 3, the robot should minimize the number of waypoints visited, so that the total time is lower. This should be a big advance to the SM approach, and should have been way easier to implement.
However, following this approach, you should see something strange. In some executions, it may happen that the robot starts by grasping the green cube, leaves it in the wp3, and then goes through the door to get the blue cube instead of getting the red one which is closer.
Can you see why this would happen? How can you fix it?
As you can see, modeling the real world is not always as easy as one may imagine at the beginning.
Exercise 5 – Acting and replanning
You will probably have got to replan many times so far, when for instance the grasping system fails. Now, let’s force some replans and see how can we improve the way the actions work.
ROSPlan uses Action Interfaces to link the abstract PDDL actions with the low-level robot control. For example, for the PDDL action pick a PickActionInterface is written, through which ROS modules that control the arm and the gripper of Tiago are called.
In order to be sure that the execution of a plan does not get stuck, the ROS modules that are called for the defined PDDL actions must consider all possible success or failure states and make sure that after a given time one of them is reached. These states will then be passed through the Action Interfaces to the planning module. In this way, it can be decided in the planning module if one action, and thus the entire plan, has failed and a re-planning is needed or if one action has succeeded and it can be continued with the execution of the next planed actions.
Let’s take as an example the implementation of the PDDL action pick . One of the called ROS modules assumes that there will be an object there. Now, let’s see what happens when one object, for example the green cube, is not there. You can move it outside the field of view of Tiago. You can do this in simulation by changing the interaction mode to Translation Mode and then select the green cube.
You can move it for example at the other end of the table.
Now, you can re-start the simulation and launch in a terminal the full system. Make sure that you select the PDDL domain and problem files through which plans containing the picking of the green cube are generated (e.g. the solution of exercise 3).
roslaunch icaps_ss icaps_ss_full_system.launch domain_path:=<domain_path> problem_path:=<problem_path>
At the end, run in another terminal the main executor:
rosrun icaps_ss main_executor.sh
We can see that the robot is executing all planned tasks until the pick of the green cube. It remains there and does nothing, waiting infinitely to find the cube. Thus, the entire planning process has blocked. The reason is that the pick module does not return any failure if no cube can be identified and thus, the action interface can not communicate to the planning module any result. The planning module then waits infinitely to a result before continuing with the execution.
The PickActionInterface inherits ROSPlan’s abstract ActionInterface class. This class automatically subscribes to the dispatcher topics, and checks that if it needs to execute its action, by calling a user-defined callback. It also checks the preconditions, and sets the effects of the action in the Knowledge Base. Let’s see what the Pick Interface is doing. Open the file in catkin_ws/src/ICAPS_20_SummerSchool_ROSPlan/icaps_ss/src/RPInterfaces/RPPickActionInterface.cpp with the IDE:
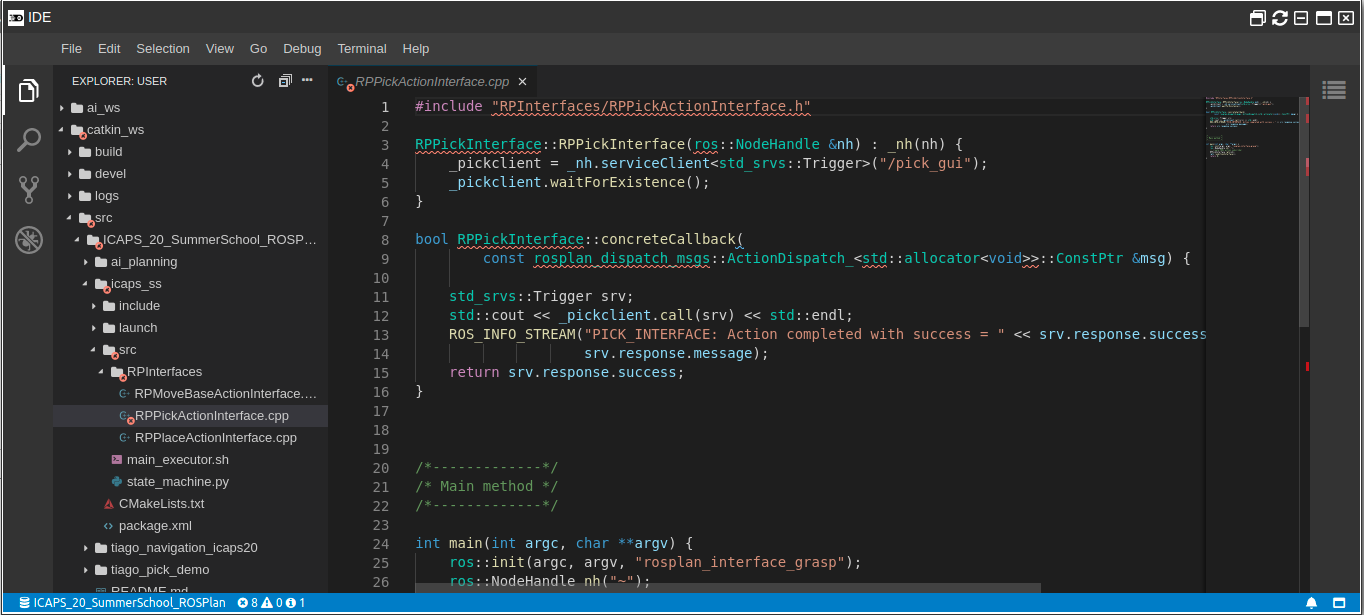
There, you will see the callback that is being called when the action is dispatched. You will see that the callback mainly calls the service which is called /pick_gui. This service implements the pick action, waiting for the sensors detect the AR tag to pick the box.
Now, let’s modify the pick module such that it passes a response to the action interface in case that the cube can not be recognized after a timeout (e.g. 30 seconds). For that you can modify the file pick_client.py. You can open from the Tools button an IDE and navigate in the overview window to catkin_ws/src/ICAPS_20_SummerSchool_ROSPlan/tiago_pick_demo/scripts and open the file pick_client.py`.
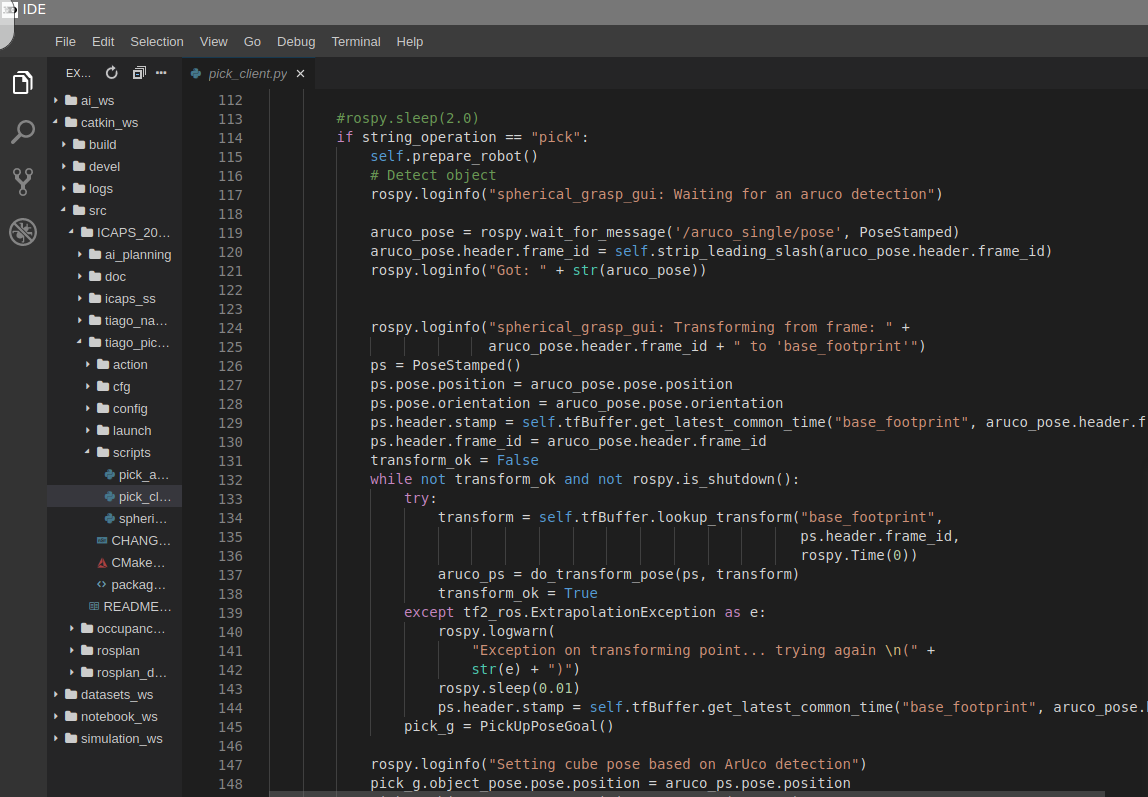
Let’s modify line 119 as follows:
#aruco_pose = rospy.wait_for_message('/aruco_single/pose', PoseStamped)
try:
    aruco_pose = rospy.wait_for_message('/aruco_single/pose', PoseStamped, 30)
except:
    return TriggerResponse(False, "Failed to recognize cube")
You have added a try-except block through which the command rospy.wait_for_message('/aruco_single/pose', PoseStamped, 30) is tried. In case that it fails and this would happen if no message about the recognized cube arrives in timeout = 30 seconds (the last parameter of the function call) the command following the except key-word will be executed. In that case, the TrigerredResponse will be passed to the Action Interface as false. Thus, the Action Interface will now inform the planning module that the concrete execution of the planned pick PDDL action has failed and consequently the entire plan will fail.
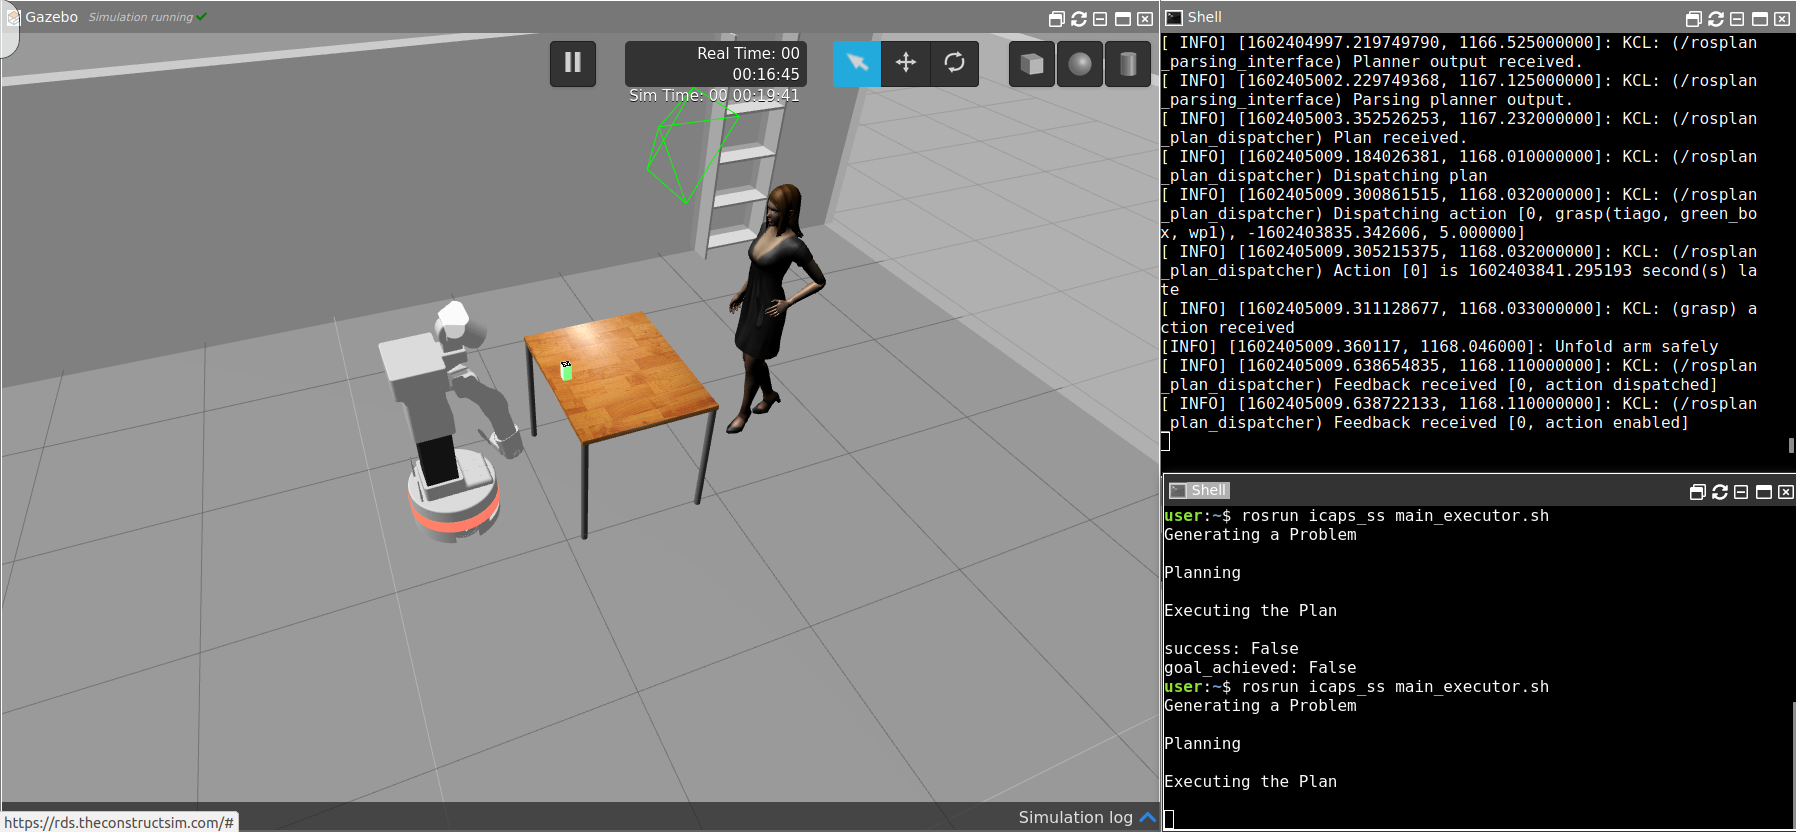
In order to check the changes you can restart the simulation and the planning module. Move the green cube at a side of the table where it cannot be seen by Tiago and start the planning procedure with the bash file mentioned above. You should expect that all tasks until the grasping of the green cube will be executed as planned. The pick task will then fail and the entire plan will fail. You can see this in the terminal:

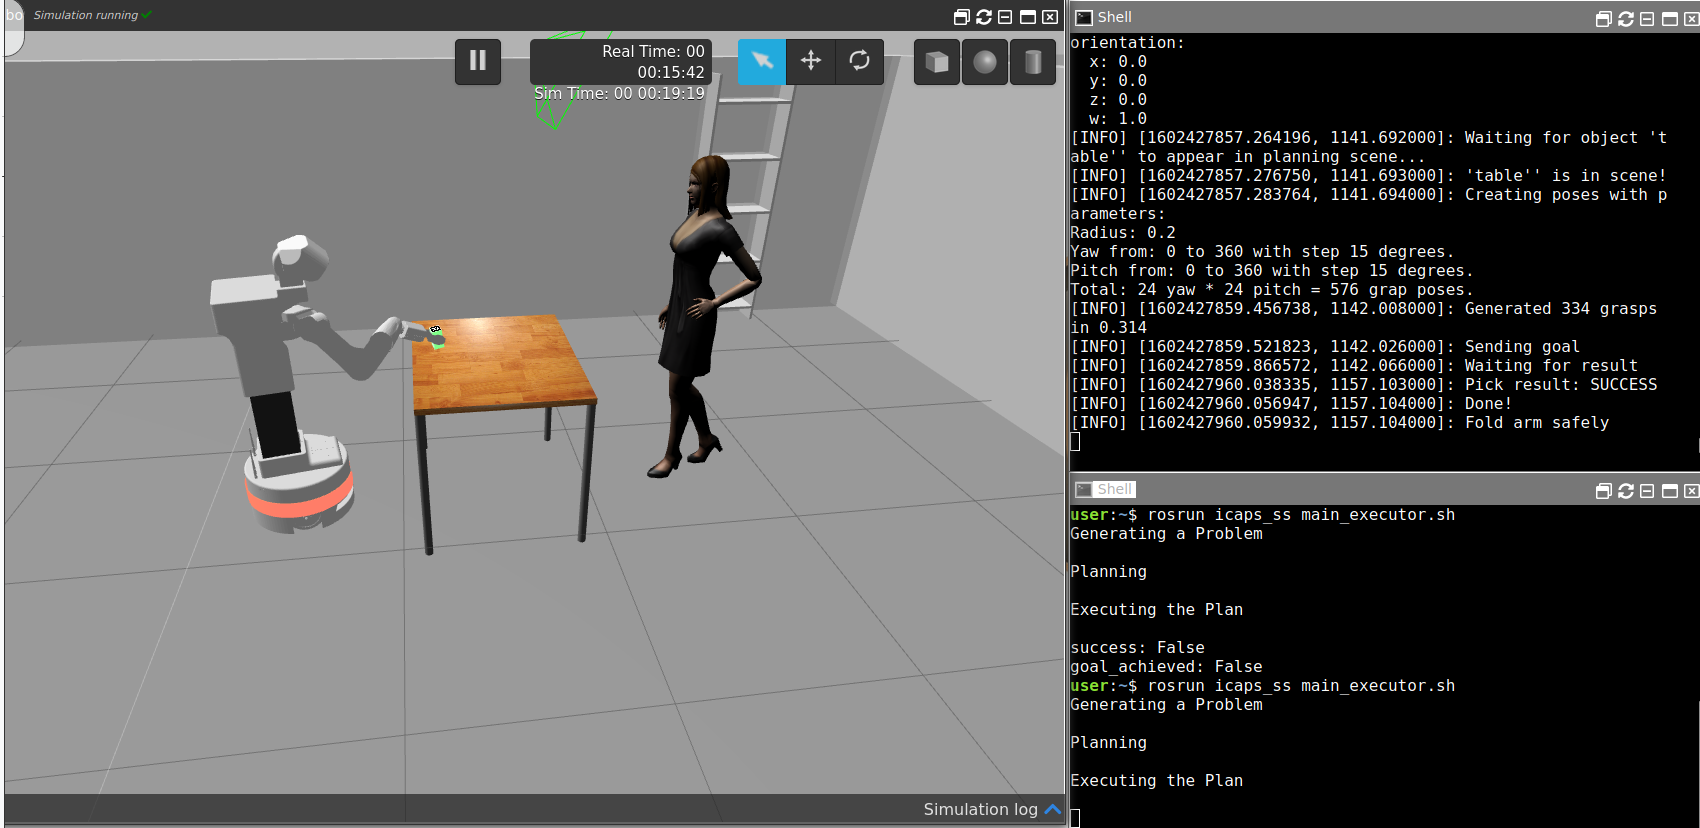
You can move the green cube back in the field of view of Tiago and re-call the planning:
A new plan should be generated and Tiago should start the grasping procedure of the green cube. This time it should end it successfully and continue with the planned tasks.
In this exercise you have learned that the concrete implementations of the abstract PDDL actions must consider all success and failure states and be sure that after a given time one of those state is reached. Furthermore, that reached state must be then passed through the Actions Interfaces to the planning module which decides if the entire plan has failed or it can be started with the execution of the next planned action. In case of failure a re-plan command can be called.
Exercise 6 – Planning changes based on sensing
Although we simplified it in this lab, in a real robotics scenario the Knowledge Base that keeps an updated state will be kept up-to-date by using information from the robot sensors (for further info you can check the ROSPlan’s Sensing Interface). Thus, a change in the environment will update the knowledge base, which may make the plan fail, for which then the robot will have to replan. This has a nice side effect, which is that the robot may be able to solve problems even when the model is not correct (i.e. unexpected side effects of an action that makes it fail). The robot will see that the next action can’t be executed, and will replan accordingly. Now, let’s simulate one of such events. While the robot is performing the task, execute the following before it tries to grasp the green box. Run this command in a terminal (with the source setup.bash).
The following line will remove the fact that the robot does not have a box:
rosservice call /rosplan_knowledge_base/update "update_type: 0
knowledge:
knowledge_type: 1
  initial_time: {secs: 0, nsecs: 0}
  is_negative: true
  instance_type: ''
  instance_name: ''
  attribute_name: 'robot_does_not_have_box'
  values:
  - {key: '?robot', value: 'tiago'}
  function_value: 0.0
  optimization: ''
  expr:
    tokens: []
  ineq:
    comparison_type: 0
    LHS:
      tokens: []
    RHS:
      tokens: []
    grounded: true"
And the next one, will add the fact that the robot is holding the green box:
rosservice call /rosplan_knowledge_base/update "update_type: 0
knowledge:
  knowledge_type: 1
  initial_time: {secs: 0, nsecs: 0}
  is_negative: false
  instance_type: ''
  instance_name: ''
  attribute_name: 'box_on_robot'
  values:
  - {key: '?box', value: 'green_box'}
  - {key: '?robot', value: 'tiago'}
  function_value: 0.0
  optimization: ''
  expr:
    tokens: []
  ineq:
    comparison_type: 0
    LHS:
      tokens: []
    RHS:
      tokens: []
    grounded: true"
After executing this, the Knowledge Base will be updated to add the box_on_robotpredicate. Now, when the robot tries to grasp the green_box, the action interface will see that the preconditions do not hold and thus the plan will fail. Then, once you try to replan and execute the plan again, the planner will assume that the box has been picked and will proceed with the plan as if this happened, but the robot will have not attempted the grasp.
In a similar case, the sensors may update the information on the Knowledge Base based on sensors, actions may fail, and a replan will start from an updated state of the world. Ideally, instead of mocking a grasp action, the robot could sens that the gripper is empty and then retry the grasp action, based on sensor information in an automatic manner.
Bonus exercise – Only one block per position
You may have observed that the planner tries to optimize the plan duration by placing objects in positions where a new object needs to be picked. While this makes sense and may be useful, placing the object may knock down the object that’s already there, or the object detector may detect the object that has just been placed and grasp it again.
Solve this by modifying the domain file so that only one box can is allowed to be at the same waypoint.